Thursday, July 9, 2015

Fabric Garden Stakes

There's nothing like an adorable garden stake to add a splash of warmth and color to a patch of greenery. On a recent drive to LaCrosse WI we took the Great River Road and passed through two beautiful towns - Stockholm and Alma. While driving past each town we came across a few interesting boutique stores and just had to stop and go into them. Among all the delightful creations of local artists were garden stakes of course! I feasted my eyes on metal beaded peacocks, blown glass butterflies, ceramic toads, polymer clay lady bugs and the like. 

A few weeks ago when I was beautifying my balcony with potted plants and making Pringles can planters, I also made these quick and very easy fabric garden stakes!


Here's what I used:

1) Some pretty fabric. (I used a cute bug print from S.R. Harris, Minneapolis. I had just got it to add to my fabric collection and realized that the 2" * 2" bugs would make perfect stakes.)
2) Hard felt remnants
3) Bamboo skewers
4) Sticky tape or needle and thread


Step 1: Start by cutting a small piece of fabric to the desired shape/ size.

Step 2: Cut a piece of felt about an inch larger than the fabric piece on all sides.

Step 3: Sew the fabric onto the felt by using zigzag stitch.

Step 4: Trim excess felt to create a border/ frame.


Step 4: Attach the bamboo skewer to the back of the prepared piece either using a bit of sticky tape or by making a couple of stitches with needle and thread.


Step 5: Stick 'em in your favorite planters and you're done!


Wednesday, June 24, 2015

Upcycled Pringles Can - Make Your Own Pretty Planters

What's summer without some major greenery around to feast your eyes upon? As the days started getting warmer I got busy getting a few plants and sprucing up our apartment balcony some. I have regular plants pots of course lined up on the floor, but I also wanted to beautify one plain wall with flowery plants. 

If you hadn't read the title of this post, would you have guessed that this planter, in it's former life, was a salty addictive snack container? :D


I still had 3 empty Pringles cans saved over from last year which I thought would make interesting hanging accents on the balcony wall. Here's what I gathered to get that done.

Supplies
1) Empty Pringles can
2) Plastic bag (the size that's usually at vegetable counters at grocery stores)
3) Sticky tape
4) Fabric or paper for planter cover
5) Mod Podge
6) Tools - Scissors, X-acto knife, Paintbrush, Nail + Hammer for making holes
7) Ribbon for hanging it up

1) Start by removing the lid and placing the plastic bag inside the can. I put my hand right to the bottom of the can to make sure I'd got it all the way there to create a waterproof surface. 

2) Place the lid back on, spread the remaining plastic bag over on the outside of the can (much like a veil) and then tape it down to the outer surface.

3) Draw a rectangle on the can about 2" from either end and 3" across. 


4) Cut the rectangular piece out with the X-acto knife by going through the outer layer of plastic and the cardboard of the can. Then pull out the bit of excess plastic through the opening created.

5) Snip away this excess plastic with scissors to create a longish hole.

6) Tape down the inner plastic to the outer plastic across all the edges of the rectangular opening to create a nice waterproof lining for the Pringles can.

7) Now we're ready to cover the can. Cut a circle out of your fabric (or paper) slightly larger in diameter than the circular sides of the can. Glue the circle down and make tiny snips all around the circle every couple centimeters so that the fabric can be glued down the sides of the can. Repeat for the other circular side.

8) Then proceed to cover the entire can and make sure to get a little extra fabric over the sides of the rectangular edges. Finish by adding a layer of Mod Podge to the entire surface to seal it well. 

9) Leave to dry several hours or overnight. Then use the nail and hammer to make 3 holes along the bottom of the can. I poked a ballpoint pen through the holes I bored to make them a little larger for any excess water to drain.

That's it! Now just fill up the can with soil, plant your flowers, tie a ribbon around the sides and hang up your beautiful planters!


Monday, June 15, 2015

An Ice Cream Birthday Party for a Cool, Sweet Boy!

It's true what they say about raising kids - the days are long but the years are short. My little baby is already a friendly, fearless, funny 3 year boy!

I really wanted to have friends over for a open air birthday picnic at a local lake/park and was mulling over the theme. I chose 'Ice Cream' for two reasons:
1) Over the years he's grown into a sweet kid and he's pretty cool, so.
2) More importantly and less philosophically, he's LOVES it. (Which kid doesn't, right?)

We've got to start with the birthday cake of course. (It just HAD to be blue, for the boy who is so obsessed with the color that one day he told me 'I don't want brown hands, I want blue hands, Mamma!'). A shout out here to my friend Priti who is an expert cake decorator and together with her husband creates unbelievable confections. She patiently answered all my queries regarding fondant, frosting and all things cakey. I baked two chocolate cakes - one round and the other rectangular, which I cut into a cone shape. I cut both pieces in half horizontally for a homemade caramel sauce filling. Then I  piped chocolate ganache onto the cone for the criss-cross ridges and used blue frosting with m&ms and sprinkles for the scoop of icecream. I've never been able to do a very neat job of frosting so this was a perfect project where blotchy and lumpy is not only fine, it's more authentic! :D. (I'm clever like that, hehe).


Also among the edible crafts were these chocolate chip popsicle cookies which I baked by spreading out cookie dough in longish shapes and sticking popsicle sticks in them.


Moving on to only slightly edible crafts - these are ice cream cone string decorations which are made this way:
1) Wrap colorful tissue paper around a crumpled ball of waste paper 
2) String together real wafer cones using a needle and thread and leave a bit of thread in between each cone and on either side of the first and last cone for handing up
3) Glue the ice cream scoop balls on the cones


Next, I hit upon the idea of using colorful paper lanterns for making large ice cream cones for handing up on a tree at the picnic. 
1) I cut out a quarter circle shape out of brown paper (not by any specific measurement, just by rolling it up against the paper lantern and then cutting approximately)
2) I drew the criss cross cone lines with a sharpie (black because I didn't have a brown one on hand)
3) Then I trimmed the upper edge of the cone as required and taped it to the lantern!


Lastly, the party favors. I found this vibrant, fruity fabric print and decided to use it as a popsicle applique against a white canvas cloth with colorful zippers to make summery looking pencil cases. A multicolored chevron printed cotton went perfectly well together for the lining!

All told, we spent a fun few hours together with friends, which is the whole point of these parties anyway. Although the day turned out to be a little chillier than we'd hoped, it was still ok thanks to my friend's portable grill that let us enjoy hot veggie burgers and samosas among other goodies. Needless to say, the kiddos all got to slurp on yummy popsicles and it turned out to be a sweet and sticky 3rd birthday party for my little boy!


Monday, May 4, 2015

Upcycled T-shirt Part 2: Thomas Cushion and a Bonus Jar!

My youngster's obsession with Thomas train has been well documented before. He's been resolutely wearing a size 18-24 months Thomas t-shirt for far longer than recommended (he will be 3 this month!). The fact that it grew clingier and more mid-riff baring by the day did nothing to faze him.

That is - until the night he wore it to bed and kept wriggling and tossing and turning at which point even he had to sadly admit that the t-shirt did not fit him anymore. (Please note that he has 3 other Thomas t-shirts. This however, made it no less heartbreaking for him). So imagine his delight when I suggested we could turn the tee into a cushion for him! He wasted no time changing into a different tee and tossing the t-shirt next to my sewing machine. 

This was a very quick and very easy project to do and made someone very happy!

Step 1: Cutting the t-shirt: The rectangular print made it easy to decide the shape. So after the knocking off the top bit, I was left with a piece that had raw top and bottom edges, but was already joined at the sides. I also thought of using the red portions of the sleeves to make the fringe - just a way to amp up the cute factor. So after cutting the largest sized rectangles possible from the red, I further snipped into each to make the fringes.

Step 2: After turning the main section inside out, I rolled up the fringes to form tassels and pinned them to all 4 corners.

Step 3:  Next I pinned around the raw edges and marked a 3 inch section on the bottom edge to leave open for stuffing.

Step 4: I sewed around leaving that gap open, cut some bulk from the corners and turned it inside out. 

Then I just stuffed the cushion until it was plump enough and whip-stitched the opening closed by hand. And that's Thomas in his new avatar :)


But I still had these little pieces left from the t-shirt - including the neckline and grey portions of the sleeves. I got out an empty jar and pulled a sleeve over it for an instant cover. (I'd done this sort of instant cover with legging cut-offs too here). It fits really snugly since knits are so nice and stretchy. I rolled up the black neckline into a rose and did the same with another white bit left from the back. 
Added on a couple of red felt leaves and my scissors stand was ready! What a fabulous coincidence that my scissors match so perfectly :D


Monday, April 20, 2015

Upcycled T-shirt Part 1: A Superhero Cape

So here goes - another upcycling project! Last Friday was Superhero Day at my toddler's preschool. Now mine is a boy that refuses to wear anything other than t-shirts and pants, no, not even button down shirts. Hence, wearing an entire superhero costume was totally out of the question. (Yes, last year he did wear a Thomas train halloween costume, but hey - anything for a bucketload of candy!). Which is why all he got was a 15 minute Superhero Cape made from an old Tshirt of mine!

You will need:

1) An adult t-shirt that has seen better days
2) Two lengths of about 7" ribbon
3) Bits of felt to create superhero logo
4) Images of superhero-y symbols (If you don't know what I mean, see below!)

Here's what you do: (I apologize in advance for the really really wrinkly pictures!)


Step 1: Lay your old t-shirt flat on work surface

Step 2: Cut out the sleeves. Then cut off the shoulder seams and use either the front or back for next steps.

Step 3: Cut a straight line from one each bottom end to the top shoulder seam to eliminate armhole curvature.

Step 4: Fold in the neck binding and sew across it, if you need to. I did because it had gotten really shapeless.

Step 5: Sew one piece of ribbon onto a shoulder seam each. Right here, take a moment to rejoice because the existing t-shirt hem eliminates the need for you to hem the bottom edge!

At this point you're done, but not quite. Now, there are rules to be followed to be a successful caped crusader. Other than a pair of underwear worn on the outside of their pants, every superhero must have an iconic symbol, his or her own calling card. Something powerful, that strikes fear, like an animal whose prowess they identify with, or the first letter in their name and so on. You get the idea. So I 'Marvel'd at some images and got jolted by an idea that struck hard - a lightning bolt would be perfect as a symbol. I had a blast designing that!

And here's my Vidyutman to the rescue! (Vidyut = lightning in sanskrit and V is also the first letter of my son's name. As you can see, I put in more time and effort coming up with a name and logo than actually making the cape. I could totally see myself channeling my inner Edna Mode from The Incredibles! Gosh, what a fun job.)


But of course, after rushing to rescues and working hard to save the day, even a caped crusader is entitled to curl up exhausted on the nearest couch! (Added bonus: the cape can double up as your blanket.)


Tearing up old t-shirts didn't end here however, as the weekend dropped another upcycling project in my lap. I look forward to telling you all about it next Monday!


Monday, April 13, 2015

Talking Hands: Cardboard Box Hand Puppets!

Posted by Kashmira

There's a group of parents at our apartment complex that likes to get together with a planned activity for the kids to do as a bunch. Usually one of the grownups decides and takes the lead on their chosen activity. 

For instance, last summer one set of parents did a planting session - they got saplings, soil and pots and taught the kids how to plant, water and so on. Then another time one mom arranged a baking afternoon wherein kids rolled out pre-made cookie dough, cutting out cute shapes and once they were baked, had a gala time decorating them with frosting and sprinkles etc. These indoor activities usually happen in the apartment community hall, which is also equipped with a small movie theater. No prizes for guessing one mom also did a movie evening with the kids, complete with Ice Age, popcorn and ice cream!

I was looking forward to doing something with the kiddos. (Something crafty of course, no doubts there!). I spent some time researching a good craft, in other words - 

1) That which would hold their attention and they could have some fun with. 
2) That which could be made with things readily available at home

I borrowed 'crafting with kids' themed books from the library but nothing really enamored me. Then I remembered these hand puppets made from cardboard boxes that I'd seen on the internet sometime but which I could not find when I recently tried looking. 

So first you take a small cardboard box (around 6" * 6" works quite well) and cover it with paper. Then with a tool like an xacto knife you slice in the middle on three sides of the box, so that it can bend and you can put your hands in the back to move the puppet. (In my first clown sample, I cut the box first and then covered it, but other way around is better.)


From here on it's a free for all - totally depending on what character you want to make your box. All you need are materials like construction paper, markers, felt paper, ribbons, buttons, yarn and what have you. I got all my clown parts ready first - the eyes, mouth, hat, bow etc. Then I first glued the mouth on first, since that's the starting reference point. Then went the rest of the parts. I used a glue gun to make the yarny hair stick.
Once the hat went on, my puppet was ready! I also made a very basic, no frills puppet theater so the kids could rock out.
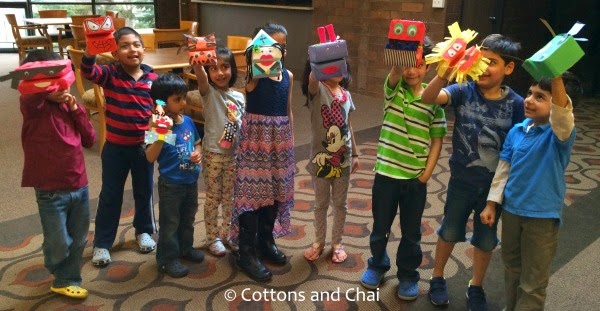
Ten enthusiastic kids and their gung-ho moms showed up to 'make a new friend'! There was no dearth of fun, laughter, glue or creativity. At the end of an hour and a half we had a fierce lion, a stripy tiger, an adorable-but-trying-to-be-scary monster, a girl robot, the quintessential superheroes Spidy and Ninjas (2!) and the most glamorous nurse you ever saw!

Best of all, each kid took a turn at the puppet theater putting up a little show with the puppet they made and proudly held up their creations for this pic!


This was a fun evening indeed and I'm going to try and do some other crafty thing again with the kids. Of course, I will let you know all about it right here, so stay tuned :)

Monday, April 6, 2015

T-shirt Applique: Aviary Tweet Birthday Gift!

Posted by Kashmira


Last month was my husband's birthday. I knew exactly what I wanted to gift him - a store bought plain t-shirt with a home made applique on it!

I spent a lot of time wondering what graphic I should do on his t-shirt. Then I remembered how that morning we'd seen birds of a feather flocked together on a newly washed car. No, just kidding. What I actually remembered was a few days ago, after looking at some cardinals on the trees outside my husband and son played a game while pretending to be daddy and baby cardinals. That's when the idea just flew into my mind - a cozy bird family!

In my excitement to get started I almost decided to wing it and just directly cut the shapes out of fabric. But yes, that would have been a bird-brained idea. Plus it would require real talon-t. So I created these pattern outlines on paper first.


Then I took my fabric and some Pellon Wonder-Under which is a fusible web. You iron it on the wrong side of fabric, cut the required shape, pull out the paper layer from the web and iron the applique on your main fabric. The fusible web gives your applique a bit of stiffness and prevents the fabric from bunching up while sewing.

Then I cut a couple of leaves from that fabric and appliqued them at the end of a twig I'd done using a zigzag stitch.

 Next I followed the same fusible web process to cut the bird shapes out of some funky and bold fabric. After cutting the first adult bird from fabric, I flipped the pattern piece over to get the other one facing the opposite way so that the two birds can look dotingly at their young 'un :)

I'm proud as a peacock to report that the birthday boy crowed in delight when he saw his gift :). As toucan see, it may not be migratest achievement, but it didn't turn out bad at all! This is aviary easy, fun and quick way to make a personalized gift. But you know what they say - talk is cheep! So I'm going to let you go and try it for yourself. Owl the best!


Monday, March 30, 2015

An experiment - Ribbon/ Fabric Manipulation Technique

Posted by Kashmira

Many years ago I watched as my Grandma made dainty little flowers using a satin ribbon manipulation technique. It was simple enough to do, but gave a wonderful result. It involves:

A) Sewing a running stitch in a wave pattern along the length of the ribbon. (I've used contrasting thread for photo purposes.)


 B) Gathering it to form a scallop/ petal like effect.


C) Knotting off the two ends of the ribbon to form a petaled flower, with maybe a button center.

I've used this method to make satin ribbon flowers for earrings and such but I've always wanted to increase the scale and try this out on a piece of fabric. I decided to go big and experiment, but also wanted to achieve a complete project. And when I pondered on what to make with a strip of fabric, I immediately thought of a scarf. 

1) I debated on whether to use knit or cotton fabrics, but went with cotton as I thought it might hold it's shape better. I started by cutting fabric into strips 5" wide. The width of the fabric was 36" so I cut 3 strips in all to have a strip long enough to be manipulated and still have a decent sized scarf. 

2) Then I joined the strips together to make one long strip 108" * 5". It occurred to me that it might be a good idea to make it a double-sided scarf, so I did the same using another coordinating fabric.


3) I pressed the strips flat, opened up the join seams. Put the two strips of fabric right sides together and sewed around with 1/4" seam and left one short end open.


4) Then I clipped off the corners, turned the scarf right side out and ironed it flat.


5) Next I drew a wavy pattern, just like on the satin ribbon. 


6) At first I machine basted the wave but quickly realized it was getting problematic gathering the double layered cotton fabric. So instead I grabbed some embroidery floss, threaded it through a large sized hand-sewing needle and made a running stitch with 1/4" sized bites after laying the fabric strip flat on my work surface. 


7) I kept gathering the fabric to create scallops and adjusting the gathers as required. Once I was satisfied with the ruching and had reached the end I make a knot and cut the thread off. Next I machine sewed on the embroidery floss running stitch, through the ruching so that the scallops would stay in place.


That's it! The scarf was done in less than a couple of hours - with a few missteps along the way. Here's how it turned out. It's really quite frilly and while that's not everyone's cup of tea, I do think it's a dramatic look (project runway rubbing off!) and that there might be some girly girls out there who actually take a fancy to it! 


Considering this was completely an experiment, here's a couple of things I'd do differently:

1) I'd use more lightweight fabrics or maybe even try it with lightweight knits.

2) I'd use a narrower and shorter fabric strip. Narrower because the size of the scallops is quite big. Shorter because even after the ruching was done the scarf is still quite long.

Still, I'm not entirely disappointed with the outcome - I know a girl who likes her frills and when I gift this to her she will be thrilled!

Monday, March 23, 2015

An Inside Look at a Quilt Show

When I took up quilting a couple of years ago, I joined a quilt guild- a local group of quilters who meet every month to share and learn more about their craft. Every two years, our guild organizes a quilt show- it is an ambitious undertaking for a small guild of just over a hundred members. We rent a large event space for the weekend. Quilt show weekend takes a year of preparation and hundreds of volunteer hours.

The central theme of the show is to showcase the quilts that we make- and a few months in advance, categories for the quilts are announced (bed sized quilts, art quilts, modern quilts, etc. and a novice quilts category for beginner quilters) and everyone is hard at work finishing their quilts for the show.

A few weeks before the show, the quilts are received from the members, each ensconced in a pillowcase for safe-keeping. Each quilt is measured, photographed and documented. A nationally recognized, certified quilt judge comes to town and spends a weekend examining the quilts and awarding ribbons in each category for first, second and third place, as well as honorable mentions and special overall awards including ones for best quilting, best applique and the most coveted grand prize of them all- best in show. Having a third-party judge to come look at the quilts is a golden opportunity to get comments on one's work and see potential areas for improvement. Quilting is a lifelong journey of learning and we can all strive to do better next time. One of the members volunteers to hand-make beautiful ribbons to put on the quilts, and pins to give out to the winners for bragging rights.

As the show date approaches, there is a frenzy of work behind the scenes. One or two people form the "layout committee" and decide how we will manage to hang the quilts so that all 200 quilts can fit in our space in a way that shows them off perfectly.

Meanwhile, there are other volunteers who handle print publicity (making posters, flyers and postcards), Internet publicity, place ads in local newspapers and send out press releases about our event.

Then the much-awaited day dawns- set up day. It starts well before the crack of dawn, at 7 AM, with volunteers arriving to a large and empty space. They start by taping off floor space- the central space will be bays where quilts are hung and around the perimeter of the space are booths for the vendors.

The materials to create the bays- boxes, poles, sheets, hardware- are stored in the basement of one of the quilters. A few volunteers show up at this place and load up a UHaul truck with all the materials, and unload it in the event space. Then, two or three teams, along with tall metal ladders get started on the work of building the bays.


By lunchtime the framework is up. Everyone takes a break and sits down to a family style lunch of sandwiches, chips and fruit.

Then the layout sheets are consulted. The quilts are brought in and laid out in different bays. The hanging teams fan out, taking the quilts and hanging them up using S hooks and cords. This takes 4 hours or so. By the end, the quilts are up and the show is on! While the quilts are hung, the vendors start driving in, unloading their wares and setting up shop.


At the end of the day, the hanging team makes one last walk through the show, adjusting the quilts just so, removing stray threads and getting things just right. Everyone takes a break and freshens up.

At 5 PM, punch is served, and the guild gathers in the auditorium. There is a lovely presentation, showing a bit of the history of the guild, the community involvement of the guild. This is also when the awards are announced, to loud whoops and cheers. The show opens, and the evening is for guild members only, to enjoy the quilts, and to do some shopping.

The next morning, Friday, the show opens to the general public. Volunteers sell tickets, greet guests and enjoy hosting the show. Back in the kitchen space, members drop off food for a potluck breakfast, lunch and snacks served all day to the members and vendors. Vendors appreciate having this hospitality and tell us that we serve the best food of any of the shows they attend.

In addition to the vendors, the guild sets up a boutique- handmade items made by members are sold here. There's everything from stuffed animals, bags, potholders, scarves and quilts of course.


This year, we organized a scavenger hunt for the kids attending the show. Kids got a sheet listing 24 items that were on the quilts (houses, animals, Christmas tree, etc.) and had to walk around the show locating the items. They got to pick a prize for participating in the scavenger hunt.

On Sunday afternoon, the show draws to a close. It takes 9 hours to set up the show but less than an hour to tear it down. The quilts get taken down, put back in the pillowcases and returned to their makers. Materials get put back on the truck and transported back to the basement for storage. Everyone is tired but happy.

There are quilt shows all over the United States, and Spring and Fall tend to be the seasons for quilt shows. So look around for a show in your town and please- go attend, look at the artistic talent in your community and prepare to be wowed.