
Posted by Kashmira


A couple of months ago we got some cushions by way of furthering the furnishing of our home. Cushions have a way of instantly bringing in a pop of color and comfort. One of the cushions came with a lime green cover and the other two were just pillow forms. So when I finally got around to making covers for them, I decided to make the easiest and quickest kind - the envelope style cushion covers.

Measuring and cutting - Making your own cushion cover is really quite simple and can work very well as a beginners' project. The first thing to it is to measure your cushion and cut your fabric. The envelope cover is made of 3 pieces of fabric: One square piece that makes the front, and two rectangles that overlap each other and form the back. This facilitates getting the cushion insert in and out of the cover and does not require a closure due to overlapping fabric.
So the basic formula I use is this:
1) Measure your cushion and add 1 inch to get the front square.
2) Divide the cushion measurement by 2 and add 4 inches to get the length of rectangles at the back.
For eg, suppose your cushion measures 20" * 20". The fabric measurement will be as follows:
1) The front square should measure 21" * 21"
2) The back rectangles should measure (20 divided by 2) + 4 = 21" * 14"
Now, the cushions that I got tend to get really squishy under weight but fluff back up once the weight is removed. It was clear that the cover needs to be very very snug. So I actually did not add that extra inch in the formula and just used the actual cushion size which was 20".
Step 1) Moving along then, I cut the 3 pieces of fabric required - the front square and back rectangles.


Step 2) I folded the one long edge of each rectangle 1/2" twice and pressed the fold well.
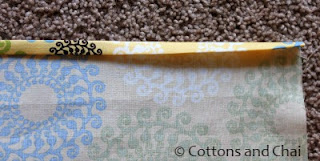

Step 3) Next I hemmed the folded edge by using a straight stitch on the machine. Repeat for the other rectangle.


Step 4) I placed the front square right side up. Then I placed one of the rectangles on it right side down such that the raw long edge on the rectangle was aligned with the bottom edge of the square. I pinned this in place.

Step 5) Then I placed the second rectangle right side down such that it's unhemmed edge was aligned with the top edge of the square and pinned in place. At this point you can see that the hemmed edges of the two rectangles overlap and this will produce the envelope at the back once we're done sewing.


Step 6) I sewed all the around all 4 sides of the square with 1/2" seam allowance and went over it twice to secure the stitches and make the cover sturdy. Next I clipped the corners.


Step 7) Then I turned the cushion cover inside out and ironed it flat. That's it - we're done!


Similarly I started on the other cushion but realized I did not have enough fabric to use on the entire cushion. So I cut up strips of a combination of fabrics and attached them together first to make the front square, then proceeded as usual.

Grt work kashu n nupur. So proud of u.
ReplyDelete